Friday, October 29, 2010

The Stranger

My love for blogs is ever growing. Especially as I search for new fun things to do. And then I look at our blog and see that I don't have to much on here...gotta-get-a-crackin'!

So I decided I wanted a long term craft project. And as anyone who knows me knows....this is a recipe for disaster. But I am trying to overcome my ADD crafting tendencies. I have also really wanted to make a quilt for a long time now. It has just been too big of a committment for me though. I did try once, but I am too hasty to get squares to match up for very long so it was VERY short lived....like maybe 30 minutes.

I am not very fond of the "old lady" quilts. I wanted to do something fun and funky. And I found what I was looking for on the blog Click Click Sew: Raw Edge Circle Quilt

So I decided I wanted to do a little pink, black, and white. So I decided to take it slow and pick out 8 fabrics I liked from Joann's...and here is the result:


It is going to be my off and on project for the next couple of months (hopefully) as I have lots of christmas and birthday presents coming up. So I cannot dedicate my entire crafting free time to it. But I am hoping that if I announce it on the blog then I will have to somewhat keep up with it. Keep me inspired guys...and I shall keep you updated!

Wednesday, October 27, 2010

When a campfire isn't available...

S'Mores Pie
I may have alluded to the fact that sometimes as an American living in Ireland, I get a hankering for something you just can’t find here. The longer I live here, the less it happens, but when it does – well I would do almost anything to feed the craving. Recently at girls night my friend Jill and I were enthusiastically telling our friends about the beauty of the S’More: Classic, simple, always delicious and rarely disappoints. The problem? In Ireland you cannot get graham crackers or American style marshmallows and the Hershey chocolate you can find is really expensive. Being a WW though I always try to keep a secret stash of Graham Crackers on hand (I bring them in my carry on when I fly back to Dublin)!
Imagine my girlish delight when I saw the recipe below on the Virtual Goody Plate . It’s a new twist on an old favourite and requires similar but not exactly the same ingredients (something Ireland is very good at). I knew I had to try it and trust me when I say I was not disappointed. Served warm it’s gooey and delicious. Chill the leftovers overnight and the next day it takes on a candybar like quality. I know we will be having this again. Don’t be intimidated by the length of the recipe either – it’s surprisingly simple and so worth the effort!
Combine the crust ingredients (I am lazy so I did this step in the pie pan)
Shape the well mixed crust around the pan. Immediately lick whatever buttery crumby goodness is left on your fingers. Put in the over for 10-12 minutes and then cool. I stuck mine in the freezer to hurry the process, but I am always looking for shortcuts!
Heat the butter and the milk on the stove top. While this is heating chop your chocolate. I didn’t chop mine small enough (see above: laziness) and it made it harder to combine in the next step. My advice – do as I say and not as I do.
Pour the hot milk/butter mixture over the chopped chocolate

Stir and be amazed at the creamy goodness you have in front of you. Let this cool completely and then pour into your cooled pie crust. The recipe says to chill overnight – I stuck it in the freezer for 90 minutes. I can see the benefits to chilling overnight, but the pie still tasted awesome.
Add your Marshmallows, trying not to play the one for the pie, one for the mouth game. Put in oven and watch carefully – they can go from white to burnt in a nanosecond!
Pull your masterpiece out of the oven and get ready to be blown away!
S'mores Pie
Crust
1 1/3 cups graham cracker crumbs (about 1 plastic wrapped package of crackers)
1/3 cup granulated sugar
5 T unsalted butter, melted

Filling
5 oz. premium dark chocolate, chopped
1/2 cup whole milk
2 T unsalted butter, cut into pieces
Pinch of salt
1/2 tsp pure vanilla extract

Topping
18 large, fresh purchased marshmallows

1. Preheat oven to 350. In a medium bowl, mix the graham crumbs, sugar and melted butter until well blended and crumbly. Transfer to a 9-inch freezer-to-oven pie pan and lightly press onto the bottom of the pan. Bake until set and fragrant, 12 to 15 minutes. Transfer to a wire rack and let cool to room temperature.

2. Place the chocolate in a medium heatproof bowl . In a small saucepan over medium heat, heat the milk and butter until the butter is melted and small bubbles form around the edges of the pan. Stir to combine. Pour the hot milk mixture over the chocolate. Let stand for several minutes, then stir until the chocolate is melted and the mixture is smooth. Stir in the salt and vanilla until blended. Let cool completely. Pour into the crust and refrigerate until well chilled, at least 4 hours or preferably overnight.

3 Heat the oven broiler to low. Cut each marshmallow in half crosswise and arrange the halves, cut side down, to cover the top of the pie. Place the pie on the lowest rack of the oven until the marshmallows toast. Watch carefully; once they start to brown, they toast quickly. Serve while the marshmallows are still warm.

Recipe from Deep Dark Chocolate: Decadent Recipes for the Serious Chocolate Lover by Sara Perry

Thursday, October 21, 2010

My Biggest DIY Project

A month or so ago, I was reflecting upon life and realized that I was turning 30 in a little less than a year and a half. This wasn't really causing me to have an OMG freak out because I was going to be 30 but it did cause my to reflect what I have done, and what I could realistically try and do before I turned 30. From this self discovery time period, I decided to do a 30 things before I turn 30 list. Recently when I traveled to Seattle, I checked a few more off the list and was trying to figure out if this is something I should share here- when I realized that it made a great deal of sense.

My Second Birthday*

Apples for Autumn


Martha Stewart has a get summer recipe called the Rasberry buckle. It's a yummy white cake with a lot of fruit thrown in. I decided to try the cake portion of the recipe with my own apple version and man am I glad that I did. This cake is a perfect combination of apple goodness and cakey moistness. Carl had it with a little ice cream thrown in for good measure and said it was definitely a repeat. That's all I needed to hear to know I should share it with you.

Enjoy!


I started by peeling and cutting all of the apples. It was only when Carl came in the kitchen and asked are you going to put this on your blog that I remembered to start taking pictures. In this pic I have already mixed the apples with 2T of sugar, 1t of cinnamon, and a pinch of nutmeg. I am in the process of adding 2T of flour to the mix.

I went about this in much the same way you would with the pineapple upside down cake. I melted butter in the pan, added a bit of brown sugar and poured the apples on top. At this point I was tempted to cook the apples without the cake, but I patiently moved on.


Combine butter and sugar with an electric mixer until fluffy.

Add each egg one at a time, blending well

Add the rest of the dry ingredients, mixing thoroughly.

Pour the cake batter on top of the apple mixture and bake for 45 minutes.

Flip the cake and enjoy! This cake would taste equally delicious not flipped - it's really up to you. I think seeing the apples makes the whole dessert really enticing, but I am strange that way...food is always calling to me!

Apples
5-7 red or green apples
2 T sugar
1t cinnamon
2 T flour
bit of lemon juice
1-2t of butter
1-2t of brown sugar

Cake
1/2 cup (1 stick) unsalted butter, room temperature, plus more for baking dish
1 cup granulated sugar
3 large eggs
1 cup all-purpose flour (spooned and leveled)
1/2 teaspoon salt
1/2 teaspoon baking powder

Preheat oven to 350 degrees.
.
Peel and thinly slice apples. Combine in bowl with sugar, cinnamon, flour, and splash of lemon juice (optional). Melt 1-2 teaspoon of butter into your pan and sprinkle with brown sugar. Pour apples in on top.

In a large bowl, cream butter and sugar with an electric mixer until fluffy. Add eggs, one at a time, beating after each addition to combine. In a large bowl, whisk together flour, salt, and baking powder; with mixer on low speed, gradually add flour mixture until incorporated


As mentioned in an earlier post, I have a serious love for cinnamon and as far as I am concerned nothing goes better with cinnamon than apples. On Sunday night I assessed the fruit bowl and realised we had more apples than we would ever get through. I thought about making a pie, but I wasn't in the humour to make my own crust and wasn't feeling energetic enough to go buy one. I looked through a few cookbooks for inspiration, but the truth is I wanted something simple. As in easy. I remembered that my soon to be mother in law had recently made a really tasty apple cake and bingo! I had decided to try my own version.

Spooky Cookies

Reading the other blogs about Halloween got me in the mood to be a little Halloween-ie myself. When my sister and I were young every easter my mom would break out the cookie ingredients and spend the morning making sugar cookie dough, chilling it and then rolling it out to cut Easter shapes. We would be allowed to invite friends over for a cookie decorating (and eating) party. We looked forward to it every year and not just for the cookies. Our mom is awesome in every way, she is supportive and wonderful and one of our best friends. She has no interest whatsoever in cooking or baking. She never really has, which is what made Easter cookies all the more special . We loved this tradition and looked forward to it every year. Being a grownup myself now, I can see what a gift that was from our mom, because she was doing something she didn’t love simply because we loved it. As an adult I have expanded decorated cookies from Easter to Valentine’s Day and now this year Halloween.
I can’t take credit for all of these though. I had help from our niece Abby, her mom and my sister. These are fun at any age and definitely a crowd pleaser (especially when brought into work).
The recipe I use for the sugar cookies comes from Pillsbury. I have tried a million recipes in my day but I find these to hold their shape the best.

Mix ingredients and add flour slowly combining thoroughly.


Cover in Saranwrap and chill in the fridge for at least one hour

I was in a rush so I did not roll the cookies, instead I just made balls.


Bake 5-9 minutes – mine took about 8. Drool over the smell wafting through your house and try not to eat them warm. Let cool for at least 20 minutes before frosting.


Use anything and everything to decorate with. I found some cute Halloween gummies that were a great base for decorations.

Take pictures immediately upon finishing because these puppies won’t last long!

Ingredients:1 cup sugar
1 cup butter or margarine, softened
3 tablespoons milk
1 teaspoon vanilla extract
1 large egg
3 cups
All Purpose Flour
1-1/2 teaspoons baking powder
1/2 teaspoon salt
Sugar or decorator icing
Preparation Directions:
1. In large bowl, combine 1 cup sugar, margarine, milk, vanilla and egg; blend well. Add flour, baking powder and salt; mix well. Cover with plastic wrap; refrigerate 1 hour for easier handling.
2. Heat oven to 400°F. On lightly floured surface, roll out 1/3 of dough at a time to 1/8-inch thickness. Keep remaining dough refrigerated. Cut with floured cookie cutter. Place 1 inch apart on ungreased cookie sheets. If desired, sprinkle with sugar.
3. Bake at 400°F. for 5 to 9 minutes or until edges are light brown. Immediately remove from cookie sheets. Cool completely. Decorate as desired.


Measure all ingredients except flour.

Sunday, October 17, 2010

Sister in Seattle: Let's make Apple Pie Ice cream

So this past week I was a bit MIA because I went to Seattle! My sister moved out there in 2008 and so the past two years I have made a trip out there Columbus Day Weekend to visit her. No, we aren't the biggest fans of good ole Christopher and his Nina, Pinta, and Santa Maria.... its because she gets off that day, and its one less day of vacation she needs to take. Right before I flew out, I had found this recipe for Apple Pie Ice cream and thought this would be perfect.... I don't need to make ice cream for myself, and I could convince her and her boyfriend that we should make it there. So that's what we did! Before I get to far, lets meet the players of this weekend:

Friday, October 15, 2010

When Gaming is Dangerous


In addition to crafting and cooking, I have another time consuming addiction. Games. It really doesn’t matter what type of game it is either. If it can be played and won, I will pretty much love it. When I was young, I couldn’t get enough of the board games: Life, Monopoly, Sorry!, Parcheesi, and Chinese Checkers. As I got older my gaming became slightly more sophisticated: Scrabble, backgammon, and the occasional game of Chess. Now a-days I still play loads of games but mostly on line, on my DS Lite or on the iPhone. When I am playing a game, I lose all sense of time and reality. I go completely into the game zone, which has it’s pros and cons. I can kill time in an airport better than anyone I know (and I spend approximately 5-7% of my life in an airport or on a plane). My logic and patience meter can be off the charts when I need it to and I really do think a lot of that comes from games. Many of the cons of loving games a little too much might be obvious: competitiveness, time killer, seeing the world as though they were jewels or coloured square blocks (thank you bejewelled and tetris), but it is the not so obvious cons that I feel compelled to share with you.

Just yesterday I boarded the 29A, climbed upstairs (all the buses in Dublin are double decker), and sat down in the front row next to a woman with several shopping bags (this detail will be very important in the coming minutes). I pulled out the iPhone and pulled up Angry Birds (*if you have a gaming addiction, I do not recommend this simple in theory, difficult in execution, time vacuum). For those who know the game, I want 3 stars on every level. For those who don’t, consider yourself lucky.

I started to play away thinking in the back of my head, this bus driver must be late for dinner, he is really putting the pedal to the metal. Next thing I know we are taking a curve at a speed not conducive to perching on the edge of a seat (mostly consumed with aforementioned woman’s shopping bags) and I realise I have a choice. I can either throw the iPhone, lose my game of Angry Birds, and catch myself or I can fall flat on my back in front of 35-40 people. The true gamer that I am, I saved the game and with it threw my pride out the window. As I was lying flat in the aisle of the 29A with my backpack slung around my face and my arms unable to free themselves, I wasn’t thinking about what the other patrons of the bus thought of me, I wasn’t thinking of how quickly I could get up and pretend this wasn’t happening - I could only think…I really hope I fell after I won that level (which of course I didn’t, but that is so beside the point).

Consider yourself warned: physical injuries from video games are a lot more common that you might think. :)


(sourced from thenextweb.com)

Thursday, October 14, 2010

Swing your arms from side to side. Come on, it's time to go. Do the Mario!

Call me a nerd, but I have had a love for Mario and Luigi for the last 21 years.

I suppose I could be considered a video gamer in the very loosest terms. I am not one who beats levels or earns all the little badges and trophies available or even finishes games. I am more of the play the parts that I like over and over again. And if I cannot beat the game I am cool with it. I mean my favorite games are the sims (and I don't ever finish playing a family out before I move on to the next one...too sad to see the sims I spent all my time working on get old and gray and just die!) and racing and fighting games where I can just push buttons and do cool things.

Wow. Quite the rant on a non-crafting and non-cooking subject. But it is definitely a big part of my life. In fact I would say the most used gift my husband and I got for our wedding is MarioKart for the wii. (Yep and the wii was bought with giftcards from the wedding as well) So for the last several years I have dreamed of making my 2 little furbabies Mario and Luigi for Halloween. And it is absolutely perfect for them as one is fat...uh i mean stocky...and the other is a skinny minnie. And they LOVE to get dressed up. No lie. One of their favorite games is to wear those little plastic leis and pretend to be powerful and sneak up and attack each other.

Anyways, I didn't want to just buy them costumes so I needed to learn to make them.. That is where the 3 year snag happened. But I have been getting really good at building my own patterns and sewing my own creations that this seemed like the perfect time to get it done. (minus the whole work thing being my busiest time of the year from august thru november)

So I scoured the world wide web for inspiration and came across my ideal inspiration for my kitty costumes! It is a blog featuring a fantastic etsy shop called Young Urban Puppy. (link)

Inspiration: Check.

Now to construct. To be honest I made a pattern after I had all the pieces cut out, just in case I would want to make another similar costume later. I really just held up fabric on the boys to determine a rough size and cut the additional pieces as they would look good.

Then the sewing was fairly straight forward. I may have messed up a few stitiches with my hastiness with the sewing machine (we tend to have a rather rocky relationship) but I think all and all for a kitty costume that will most likely just be see in pictures they will be sufficient and a point of pride for future generations.
The boys get very into my crafting. Especially the picture taking portion. Unless they are supposed to be a model as we will see later... But here is OJ trying to help take pics of the final costume
Now on to the more challenging section, the hats... I once again googled for inspiration and found exactly what I wanted quickly. (link)


They ended up being fairly straight forward and working out super well... So here are the final products!

Amaretto as Mario:

OJ as Luigi:

Tuesday, October 12, 2010

Sick Day Entertainment (Tracy)

So I was home sick a few weeks ago, and in between calling two doctors' offices and the pharmacy multiple times, along with waiting for prescriptions to be filled, I decided I needed a crafty project to fill up some of my time. I got my sewing machine for graduation a year and a half ago, but haven't had room to set it up since. Well since I now have a room solely for crafting....I was itching to test it out. I decided on a baby dress, since it was small and I could probably finish it in a day. I found a pattern online, bought a half yard of fabric, and went to it.

Since it was a summery dress, I picked a heavier fabric, hoping it would be more appropriate when paired with something under it. I also decided the dress was going to go to a former co-worker of mine, who has a darling little 2 month old. The pattern was for a 1-3 month dress, so I enlarged it a bit in the hopes that it will fit for most of the winter.


Gathering the skirt....


Sewing....


Almost finished product. I bought the wrong trim and had to go back to exchange it, so I didn't quite finish it on my sick day. Close though.


And here it is, trimmed up, tied up, and ready to be put in the mail! Hopefully baby Audrina enjoys it! :)

Sunday, October 10, 2010

I'm Still Standing....Yeah Yeah Yeah...

Hey guys...so I have been somewhat MIA... Silly real life job taking over my fall. But I do have a project in the works and I need to announce it to the world! A Halloween combination of my two favorite things...

It involves a little of these two:
And a little of these two:

:) Super excited to show you how it turns out and the possible trials and tribulations of building my own pattern... Hoping to get it finished on Saturday (an almost day off!!!)

Tuesday, October 5, 2010

Hello fellow project enthusiasts!

Hey everyone - yes, I do exist! I know you've all probably been thinking "what's up with this slacker on our blog..." - well there was a snafu with my getting the log in email, and got that straightened up last week. So I've only been a slacker for a week. :)

Anyway, just a little introduction before I get down to the project business.

Pennie and I met in college, where we were both on the activities board. (BTW, Pennie, my following-in-your-footsteps award has been proudly displayed ever since, until I moved 2 months ago, and it is now being prepped for scrapbookage.) I was basically born into crafting - my mom is a big crafter as well. Through the years we've run the crafts section of VBS, made decorations for my homecomings and proms, made Christmas presents, decorated cakes, sewed clothes, dolls, and tons of other stuff. It's what we do.

Life now: BA English, MS Library Science. I'm librarianing at a community college, and crafting in my new apartment. My boyfriend, Jason, and I have been together for almost 4 years now. My little sister, Jackie, just got married in July. So that's all I have for now....on to the project!

So, as all of the wedding festivities were being planned in our house, my mother and I looked for every opportunity for a handmade project. The one that I took on that was my favorite was deciding that veils are way too overpriced, and that I could make something just as nice for way less money. Which ended up being true, though I highly underestimated the amount of time that goes into those things. But I enjoyed it, and Jackie did too, so that's all that matters! I didn't know I would be blogging about it, so I don't have any in-progress pictures. Sorry!

First we tried on a whole bunch of veils with her dress. It was more of an important step than I realized, because we ended up trying to recreate something that was pretty different from what she thought she wanted. I scribbled a few design ideas, and tried to figure out what the shapes were before they were bunched up on an itty-bitty comb. After that - on to Hobby Lobby! We got two different tulles - intended to try both of them, but ended up just going with the first one I cut. We got clear beads, silver beads, and ivory beads.

I cut a 60" half circle, and gathered it onto a metal comb. After trying it on, undoing it, cutting again, redoing it, trying it on, undoing it again, cutting it again, and redoing it....possibly 3 times...we were happy with the shape.


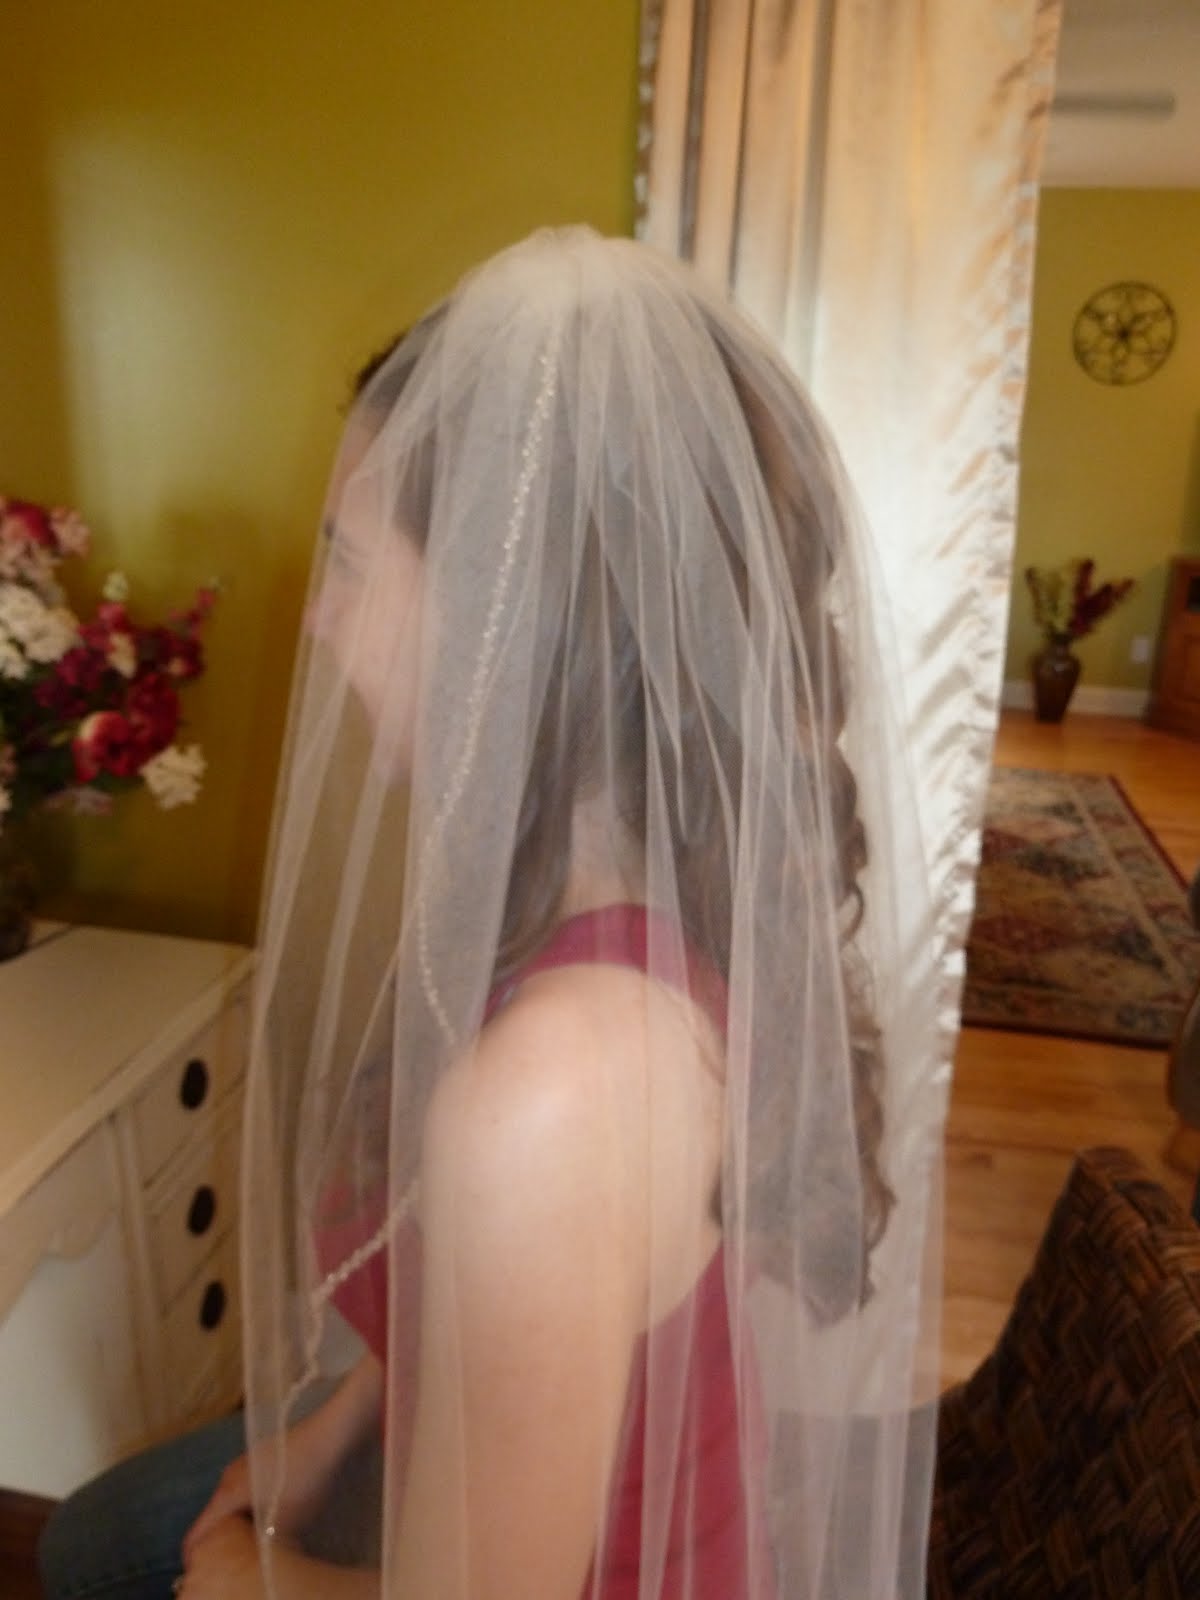
At this point, I began beading. And beading. And beading. Clear fishing wire type string? doesn't work. I ended up with ivory thread, even though you could see it more than I wanted up close, it looked great from a few feet away - and that's all we needed it to do. Here's the full veil:


And here's an up-close shot of the beading:


And of course, a few shots of all it's gloriousness in action:


So that's the first project! More to come....

Monday, October 4, 2010

Strawberry Shortcake

Since I was a small girl I have loved shortcake, mostly because it was one of the first things I learned to make. . .if you count carefully following the shortcake recipe on the back of the Bisquick box as making something from scratch. Even at a young age, I got such satisfaction out of watching the dough fluff and turn golden, and then biting into the warm and soft but not overly sweet shortcake. My love affair with shortcake only heightened when we met again, this time at the Cheesecake Factory. Who eats shortcake at the Cheesecake factory you would be fair in asking? I do every time. I love their version so much, I have modified my own recipe to include the genius ingredient that makes theirs so good: ice cream. This recipe is quick and super easy, looks wonderful if serving to guests, and delicious every time. Enjoy!


Gather your ingredients and preheat the oven to 425 degrees.

Combine the dry ingredients create a well in the centre to place your egg and milk.

Combine with a spoon or fork until just wet.

Separate into the amount of shortcakes you want to make (I made 9 and they were a good size)

While the shortcakes are cooking, it’s time to chop the strawberries and combine with 2 tablespoons sugar.

For this step you can buy Cool Whip (not available in Ireland), whip cream or make your own sweet whipped cream. I chose to make sweet whipped cream.

1 cup whipped cream
2 Tablespoons Confectioners /Icing Sugar
½ teaspoon vanilla
With a hand mixer, mix cream until soft peaks form. Add sugar and vanilla, mixing until soft peaks form again. Set aside

Finished short cakes and cream:


I was transporting this dessert to girls night so I kept all the goodness separate until it was eating time to reduce the sogginess factor.


Ingredients

3 pints fresh strawberries
1/2 cup white sugar
2 1/4 cups all-purpose flour
2 teaspoons baking powder
¼ cup white sugar
1/4 teaspoon salt
1/3 cup butter
1 egg
2/3 cup milk
2 cups whipped heavy cream

Directions
Slice the strawberries and toss them with 1/2 cup of white sugar( I reduced this to two tablespoons and was still plenty sweet). Set aside.
Preheat oven to 425 degrees F (220 degrees C).
In a medium bowl combine the flour, baking powder, 2 tablespoons white sugar and the salt. With a pastry blender cut in the shortening until the mixture resembles coarse crumbs. Make a well in the center and add the beaten egg and milk. Stir until just combined.
Split evenly into 9 small shortcakes. Bake at 425 degrees F (220 degrees C) for 11 to 13 minutes or until golden brown. Let cool partially in pan on wire rack.
Slice partially cooled mini cakes in half, making two layers. Fill with ice cream and replace the top. Top with strawberries and cover with the whipped cream.